 |
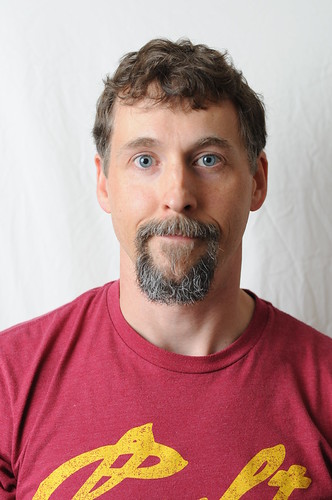
| shot at 50mm, ISO 400, f/3.2, 1/250th, 2 strobes at 1/16 pwr |
After careful examination and spending countless hours weeding thru all the many, many applications from models all over the world...I have made my final choice. The model I intend to use today as my guinea pig when showing you a classic example of a portrait will be...ME. (My original choice -- my younger brother -- didn't work out, but I'll hog-tie him down later.)
Oh well! You'll just have to suffer thru it (and maybe have a little chuckle at the same time.) Yes, this will be a self-portrait. And as such, a little more challenging because it is always easier (and preferable in my opinion) to shoot someone else rather than shooting yourself self-portrait style. It's time-consuming, and well...I just like being behind the camera like I have said before. But necessity rules the day, so you got me to look at right now.
Okay, remember the last post? (click here) I will be using the same lighting set up shown there as I will in my real-life example today. Here's the details:
I simply put one of my SB-800 flash guns on a stand about 4 feet from myself (this would be to camera-left) at a 45 degree angle. This is my key/main light. I shot it thru a white umbrella to soften the light a bit. (Most often, soft light is the order-of-the-day when it comes to portrait-style photographs.) I then set up another SB-800 off to the other side -- to camera-right -- but set back an additional 3 feet...so we'll say 7 feet from me. This is my fill light.
Once my strobes were all set up, I put my camera on a tripod and aimed it right where I would be standing. I made several test shots until I achieved proper exposure, which was as follows:
The ISO sensitivity was set at 400 when powering the camera up, so I left it right there and worked with it. I wanted to fuzz my background a bit so I swapped to a "faster" lens that allowed me to set my aperture to a very wide f/3.2. 1/250th of a second shutter speed was an order to cut out all ambient light. Once all set, I focused on the strobes' power setting. 1/4th power...total wash out, 1/8th...better, 1/12th...still to bright. Then I found the perfect setting...1/16th power for the both of them. Slightly overexposed, but that's what I'm aiming for.
Now, you may laugh at how I achieved proper focus, but you have to improvise at times. Being that my aperture was set so wide, the "fuzz factor" (I call it) was large...meaning that only a very small place between the camera and the backdrop was perfectly in focus. That's where my eyes should be. I can't be in front of the camera and focus it from behind the camera it at the same time (unless I want to dig out my remote "clicker", which I didn't). So...I found one of the pussycat's toys laying around that I could attach to the top of the backdrop and let it's little streamer (that the cats love to bat around when you wave it in front of them) hang down right where my forehead would be. Now I had a focal point. [How 'bout that? Those cats are worth something after all.]
After using the self-timer feature and shooting for about 10 minutes, I finally got what I wanted. I picked the photograph where I wasn't looking just but so dang goofy and went with it.
 |
| shot at 50mm, ISO 400, f/3.2, 1/250th, key light only |
To help illustrate the difference of using fill lighting vs. not using it, I have included another photo using only the key light. Can you tell the difference? Scroll back and forth and see if you can tell what shadows are present this last picture in comparison to the final product up above.
Look at the left side of my face (the right side of the photograph). Those are the shadows that that the fill light corrects...or fills, just as the name suggests. Pretty neat right?
Okay, enough already. Now you've seen me on my own blog. Next time I hope I can find someone a little better-looking to be my guinea pig.
Play around a bit and see if you can hold a family member still long enough to practice your portrait shots. It really is a very practical skill that you need to master, because it's use bleeds into many other areas of photography that you will see pretty consistently.
Thanks for reading!
Brant
Wow, look at you...you made it all the way thru my post! I really appreciate you as a reader. Don't forget to register your email for automatic updates up at the top. Please pass this blog post on to your friends using the Tweet, Facebook, and Google+ buttons. That would be awesome.
No comments:
Post a Comment